We shall start our tutorial with creating a scenario, one of the principal elements of anyLogistix. Further on during this tutorial we will populate it with complete information on shipping and related operations, as well as all the data on vehicles, warehouses, etc. This information will be used for running experiments and building reports.
Let us begin.
The numbered lists in tutorials are actually checklists. Click the numbers to save your progress!
Create a scenario
-
Click the Add button on the left side of the scenarios ribbon, then select
 Create scenario.
The Create Scenario dialog box will open:
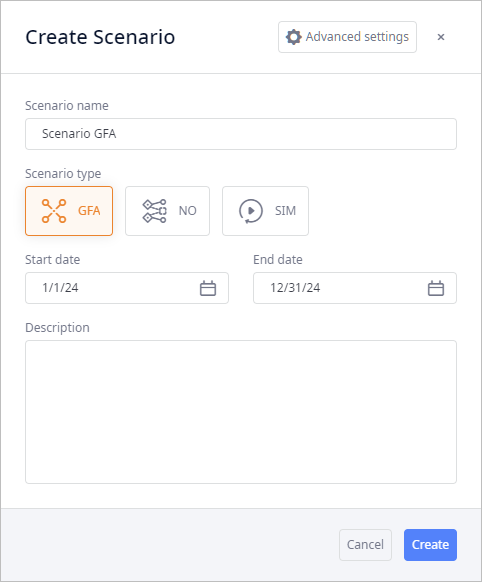
- Type My Supply Chain in the Scenario name field and leave all the rest fields as they are.
-
Select the
 label in the Scenario type section to create the scenario of the GFA type.
-
Click Create. The new scenario will instantly open.
You can always modify the scenario properties later by right-clicking the scenario and selecting
 Properties from the context
menu.
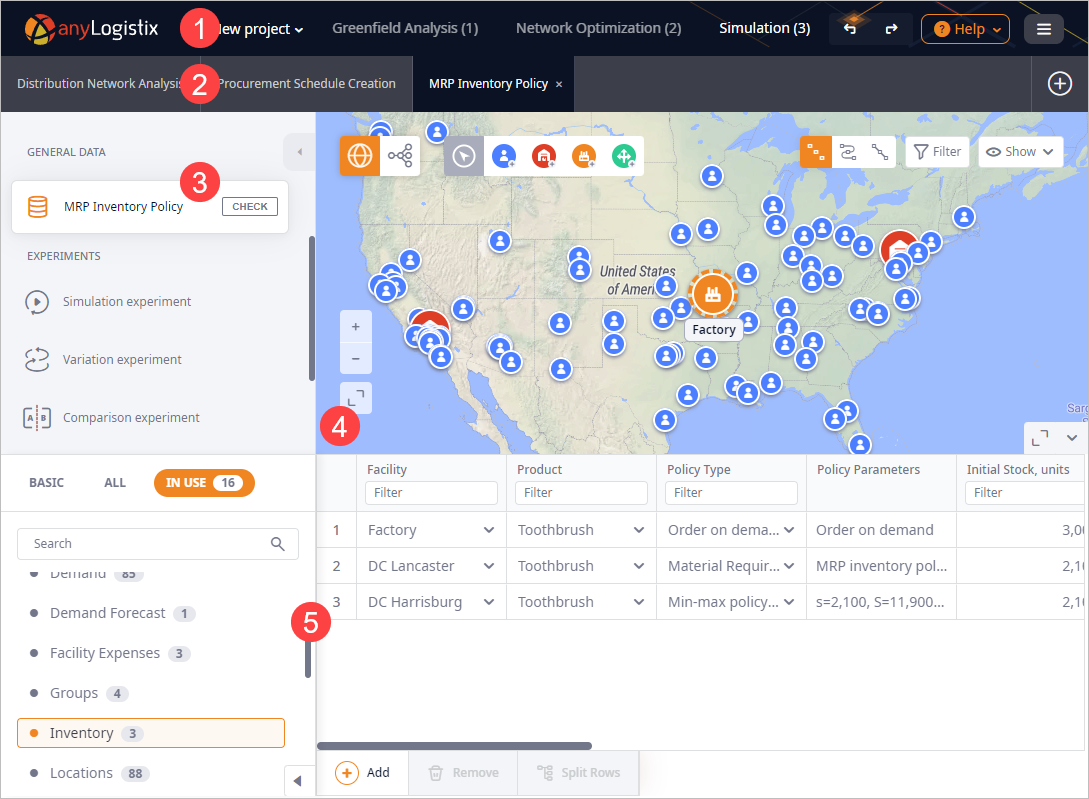
Once the new scenario is created, you will see the default anyLogistix workspace, which consists of the following areas:
- Toolbar with controls.
- Scenarios ribbon.
- Input data, experiments and their results, controls for validating data and switching between the supply chain and experiment modes.
- The map displaying the elements of the supply chain scenario and their connections
- The dashboard, which shows:
- The list of tables and the table editor in the data supply chain mode (the default mode).
- The statistics dashboard in the experiment mode.
Having created a new scenario we can start populating its tables with data.
As you might have noticed, the Products and Periods tables already contain records, this is automatically done by anyLogistix in the tables that are required to run the experiment. These records can be edited later.
Let us start with adding customers to our model. Each customer is located in a certain city on the territory of the United States of America. The following cities will be considered in our supply chain: Washington DC, Dallas, Philadelphia, Jacksonville, San Diego, Chicago, New York, San Antonio, Los Angeles, San Jose, Phoenix, Orlando, Denver, Nashville, Detroit, Boston, Atlanta, Seattle, Kansas City, Salt Lake City.
You can either follow our scenario and use the same list of customers or you can use your own set of customers. In either way, make sure that you follow this tutorial steps as we design our supply chain.
Add a customer via the GIS map
-
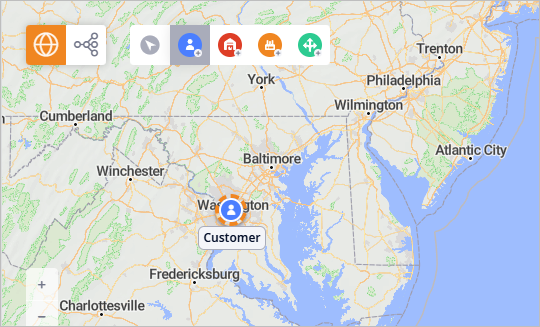
Use the GIS map to navigate to the USA and zoom in close enough to be able to see the city names. Let us locate our first customer in Washington, DC. You can see it on the screenshot below.

-
Click the
 Create Customer icon in the GIS map toolbar.
- Click the Washington, DC city marker on the map to place the customer.
A new customer will be created.
Each time you place a new customer by clicking the GIS map, anyLogistix creates new record in the Customers, Locations and Demand tables for it.
- When done, click the
 Panning mode
icon to the left of the
  Create Customer icon to exit the editing mode.
Now that we have created a new customer, we must give it a meaningful name. Below the GIS map you will see the automatically opened Customers table containing the record with the previously created Customer customer.

Rename a customer
- Double-click the Customer cell in the Name column to activate the editing mode.
- Type Washington DC and press Enter to exit the editing mode.
The customer will now have a meaningful name referring to its actual location. The customer's location name in the
Location column will be automatically updated.

The mentioned location is automatically set based on the GIS map spot that we clicked to create this customer. All the available locations are stored in the Locations table. If you navigate to this table, you will be able to manually define the location of the customer.
Navigate to the Locations table
- Click the In Use table tab to browse through the list of all the GFA related tables.
-
Scroll down the list and click Locations. You will be taken to the Locations table.

-
Now we will edit location. There are two alternative ways to manually define the location of the customer. You can do either of the following:
- Specify the location's Latitude and Longitude coordinates.

- Type the city name in the City column, specify the name of the Country (e.g.
Washington DC,
USA), and click Autofill coordinates.
anyLogistix will connect to Maptiler GIS search to get the exact coordinates, and place the customer at
Washington DC (the Latitude and
Longitude columns will be automatically filled with the received data).
Use this method if you want locations of your customers to have actual geographic names to which you can refer from the other tables.

- Specify the location's Latitude and Longitude coordinates.
Now that we have created our first customer, we can proceed to add all other customers in the very same way.
To save some time and eliminate possible customer locating issues we provide you with the exported scenario MS Excel data sheet containing all our customers and their locations. Use it to import the data into the existing scenario.
The importing data does not contain the previously created Washington DC customer.
Import customers to this scenario
-
Click the
 Add button on the left side of the scenarios ribbon, then select
 Import scenarios.
- Add the MS Excel file with the scenario data to import by either dragging it onto the dialog box, or by clicking the browse files link, and navigating to the existing file.
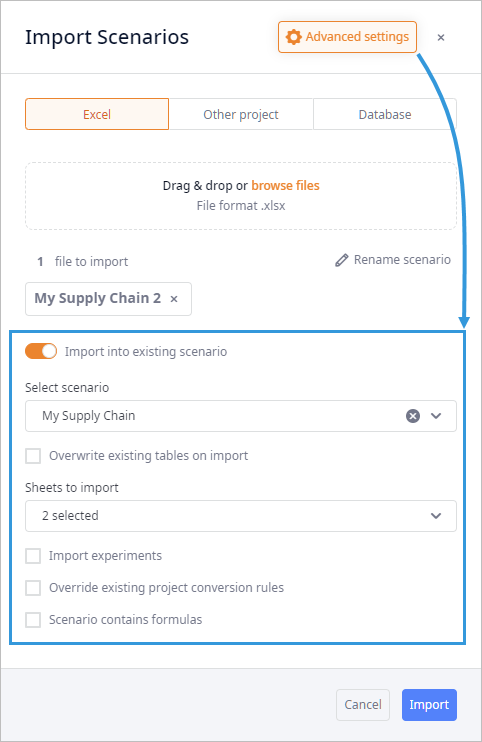
- Click the Advanced options button in the header of the dialog box to open the advanced section and modify the import parameters.
- Enable Import into existing scenario, then select the My Supply Chain scenario from the Select scenario drop-down list. In this way, we will import the data of the selected MS Excel file into the existing scenario.
- Click the Sheets to import drop-down list and check Customers and Locations. This means we will import only the tables containing customers and their locations.
- Now deselect the options: Import experiments, Override existing project conversion rules.
-
Click Import to import the data.
When done, you will see all the customers on the map.
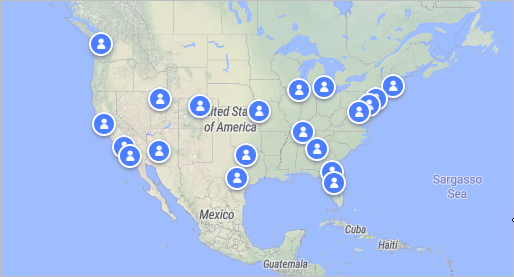
Once you have added all the customers, you can move on to the next step to specify the product your supply chain will be providing the customers with.
-
How can we improve this article?
-

