

This article describes global icons editing for all scenarios of this project. Spot icon editing is also possible within the required scenario.
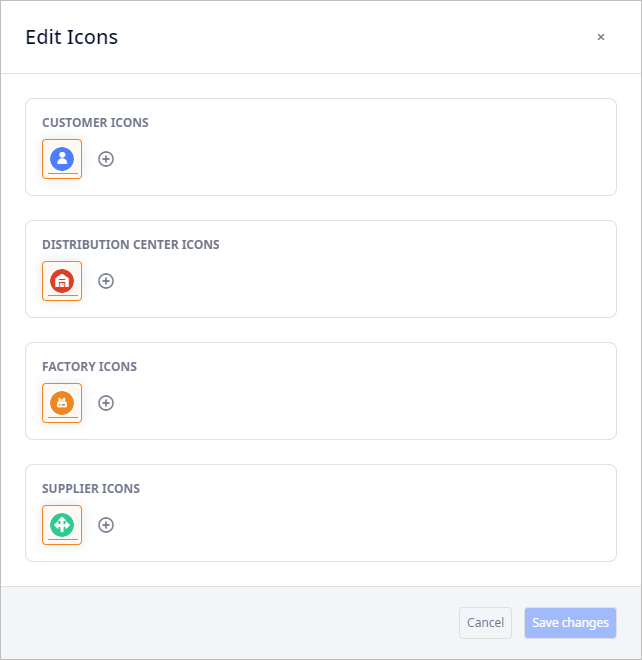
The Edit Icons dialog box allows you to add, remove and set default icons for the distribution center, factory, customer and supplier objects of your supply chain scenarios within this project.
The icons you define here belong to this project only.
The default icons representing types of supply chain objects in all scenarios of a project:
| Customer. Custom icon is defined in the Customers table. | |
| Distribution center. Custom icon is defined in the Distribution Centerstable. | |
| Factory. Custom icon is defined in the Factories table. | |
| Supplier. Custom icon is defined in the Suppliers table. |
To open the Edit Icons dialog box
- In the toolbar click
 Preferences and select
 Edit Icons.
The Edit Icons dialog box will open. It contains a set of tiles per each object type. Each tile comprises:
-
The default icon and user-defined icons for the corresponding object types (DC, Factory, Customer, Supplier).
The set of icons a tile contains is available in the
Icon column of the anyLogistix tables of the corresponding object type.
The default icon is the icon that is highlighted in the tile. Such icon is automatically assigned to all created / generated objects of this type. To set a new icon as the default icon, click it.
To assign an icon for a specific object only, open the table of the corresponding object type, and set the required icon in the Icon column.
Apart from this:
- GFA experiment allows setting a new icon for the distribution centers that it provides in its results.
- New icon can be set to the additionally generated objects.
-
 — click to open the Add New Icon dialog box.
-
The default icon and user-defined icons for the corresponding object types (DC, Factory, Customer, Supplier).
The set of icons a tile contains is available in the
Icon column of the anyLogistix tables of the corresponding object type.
To add a new icon
- Open the Edit Icons dialog box.
-
Click
 in the tile of the required object type.
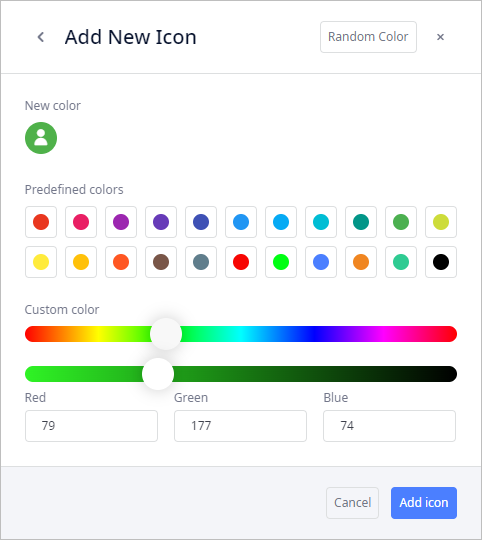
The Add New Icon dialog box will open.
in the tile of the required object type.
The Add New Icon dialog box will open.
You can also open the Add New Icon dialog box by double-clicking the object icon in the Icon column of any object table (Customers, Distribution Centers, Factories, Suppliers), and then clicking
.
This way you can instantly create a custom icon for the required object.
-
Now define the new color by doing either of the following:
- Pick a color from the Predefined colors.
- Set Custom color by dragging the sliders.
- Specify the RGB values of the required color.
- Click the Random color button in the header of the dialog box to select a random color.
-
When done, click the Add icon button.
The dialog box will close, the new icon with the selected color will be added to the corresponding tile. You can now set it either as a default icon for this object type or as a custom icon for a specific object of this type.
To set a default icon
- Open the Edit Icons dialog box.
- Click the required icon in the tile of the corresponding object type (you may need to create a new icon for this). The selected icon will become the new default icon for this object type. It will be assigned only to new objects of this type. The previously created objects of this type will keep their original icons.
- Click the Save changes.
To remove an icon
- Open the Edit Icons dialog box.
-
Right-click the required icon, then select
 Remove from the drop-down menu.
If there is just one icon available, it cannot be removed.
Remove from the drop-down menu.
If there is just one icon available, it cannot be removed.
If you remove the default icon, a new default icon will be automatically selected from the remaining icons in this tile.
- Click the Save changes.
-
How can we improve this article?
-