

Alongside the creating and locating facilities within your supply chain model, GIS map also allows you to examine the facilities that you can see on the map, filter them, convert them and delete the unwanted facilities.
-
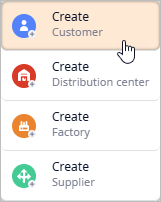
Click the required element's button on the GIS map toolbar.
 Create Customer
 Create Distribution center
 Create Factory
 Create Supplier
 -
Hover your mouse over the required location and click it to create and place the supply chain element there.
You can also right-click the required spot on the map and select the element that you would like to create from the shortcut menu.
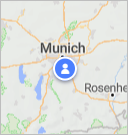
The newly created customer will appear on the map:
-
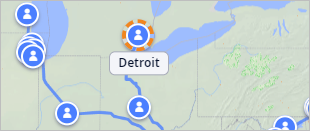
Click the required facility on the GIS map to select it.
A description box will appear, containing the name of the selected facility.
During runtime the description box offers more details.
-
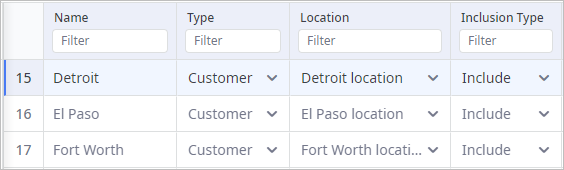
Navigate to the dashboard below the GIS map.
You will see that it contains the automatically opened table of the selected facility.
- Click the required facility on the map to select it.
- Drag it to the required location.
Alternatively you can:
- Click the required facility on the map to select it.
-
Select the required location in the Location cell of the table that will automatically open in the dashboard below the GIS map.
If you accidentally relocate an element on the GIS map, you can always restore its previous position with the help of the Ctrl + Z (macOS: Cmd + Z) shortcut.
-
Right-click the required facility (of Customer, DC, Factory or Supplier type) to open its context menu.
The Consider inclusion type will be switched to Included on converting objects of DC or Factory types to the Customer or Supplier types.
The type of the resulting object depends on the type of the initial object that you are converting. You may perform the following conversions:
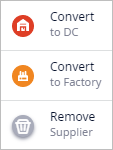
- Customer to Distribution center, Factory
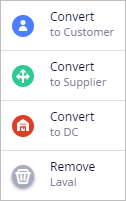
- Distribution center to Customer, Factory or Supplier
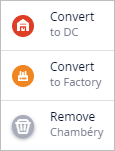
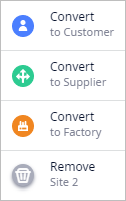
- Factory to Customer, Supplier, Distribution center
- Supplier to Distribution center, Factory
-
Select the required option from the menu:
Once converted, the current element's table record will be automatically moved to the table of the resulting element type (Customers, Distribution Centers, Factories, Suppliers).
-
When converting Customer
-
When converting Distribution center
-
When converting Factory
-
When converting Supplier
-
When converting Customer
- Click the just converted element to select it and automatically open its table record for adjusting its properties.
To simply select a number of required facilities:
- Select the required elements by holding Ctrl and clicking (macOS: Cmd + click) the facilities you need. Release the button when done.
- Place your mouse cursor beside the group of elements you need to select.
- Press Shift and click and drag your mouse to select all the elements within the area of selection.
- Release the mouse and the Shift buttons when selecting is done.
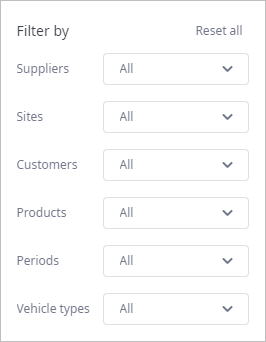
You can filter or hide the required elements on the map.
To filter elements
-
Click the
 Filter button, to open filter options.
-
Then click the drop-down list to the right of the required parameter
and select the checkboxes of the required elements to highlight.
Certain connections between the map elements may become invisible depending on the selected filter options.
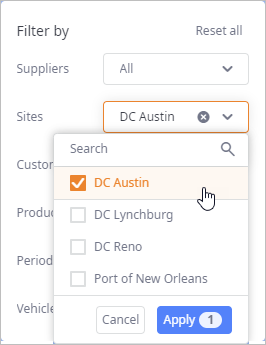
- Click Apply to apply the changes. The map will now show only the selected objects. Other connections and the non-selected objects will be hidden.
- If required, click Reset all to removes all defined filters.
-
Click the
 Filter icon again to close the filter dialog box.
To hide elements
- Click the
 Show button to open the drop-down list of controls allowing you to toggle
visibility of the element types on the map.
Show button to open the drop-down list of controls allowing you to toggle
visibility of the element types on the map.
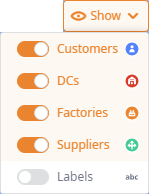
- Click the required toggle-button to hide / show certain element types.
To delete an element
- Click the required facility on the GIS map to select it.
-
Press Delete. The selected facility will be removed from the GIS map, its record will be removed from the corresponding table
(Customers,
Distribution Centers,
Factories,
Suppliers depending on the type of the element).
When you delete an element, the record about its location (stored in the Locations table) will be also removed, unless some other object uses this same location. In case of a customer, its demand will be removed as well.
In the runtime mode the map offers:
- Details of an object with real-time update of the statistics.
- Access to an object's inside logic. This logic cannot be edited here.
The runtime mode is available in the Simulation experiment only.
To initiate the runtime mode start the Simulation experiment by clicking  Run.
Run.
-
Click Run to start the Simulation experiment.
-
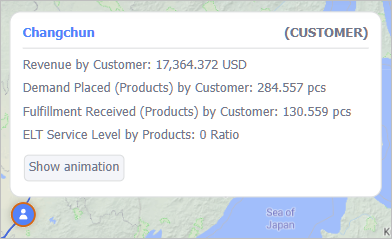
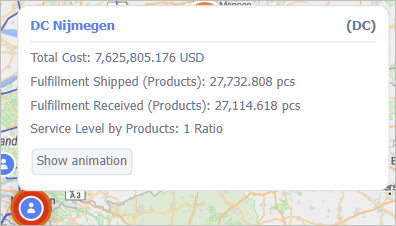
Click the required object on the map to select it.
A description box will appear, containing:
- Changchun — name of the selected object.
- (CUSTOMER) — type of the selected object.
- Set of statistics (the set differs depending on the object type).
- Show animation — opens the flowchart with the object's logic.
-
Click Run to start the Simulation experiment.
-
Click the required object on the map to select it.
A description box will appear.
-
Click the Show animation button in the description box to open the flowchart with the selected object's logic.

- Click Back to map on the left side of the flowchart's header to return to the map view.
The description box of an object (when opened in the runtime) contains a set of statistics that differs depending on the object type:
- Customer object type statistics:
- DC object type statistics:
- Factory object type statistics:
- Supplier object type statistics:
-
How can we improve this article?
-