

anyLogistix allows you to export scenario data from your project to the required database.
When exporting to PostgreSQL make sure it is PostgreSQL 14 or newer.
To export scenario data to a database
- Right-click the required scenario and select Export.

The Export dialog box will open.

-
If required, click
 Rename scenario
to specify the name the exporting scenario should have in the database.
This option is available if at least one scenario is added to the export list.
Rename scenario
to specify the name the exporting scenario should have in the database.
This option is available if at least one scenario is added to the export list.
-
If required, you can clear the list of the exporting files by clicking
 Remove all.
This option is available if at least two scenarios are added to the export list.
Remove all.
This option is available if at least two scenarios are added to the export list.
-
Click the Add scenario to export drop-down list, if you need to export several scenarios.
Multiple import / export supports 10 scenarios. If you are importing e.g. 15 scenarios, the importing process will start for 10 of them, while 5 scenarios will be queued.
-
Click the Database tab, to open the database connection settings.

-
Database type — specify one of the supported DB types: sqlite (not available in the Professional Server version), sqlserver, postgresql, mysql.
When exporting to PostgreSQL make sure it is PostgreSQL 14 or newer.
- Database address — specify the location of the database.
- Database name — specify the name of the database.
- Database login — specify the login that can be used to access the database.
-
Database password — specify the password that can be used to access the database.
The type of role and access rules for a user are defined by the administrator of the database. In other words, by using the provided credentials you are accessing the database with the user profile that has certain rights defined by the administrator for you.
-
If the connection settings are correct, the section will collapse into a tile, showing the name of the database you are connected to.
To change the connection settings, click Change database.

- Disable the Export experiments toggle button if you do not wish to export the experiments of the scenario.
- Enable the Export empty data tables toggle button if you wish to export the empty tables of the scenario and the default parameters of the experiments.
-
Click Export.
If export of a certain scenario takes too long, you can cancel it by right-clicking the scenario's tab and selecting Cancel export. This option is available only during the scenario export.
The destination database will contain the tables containing data of the exported scenario
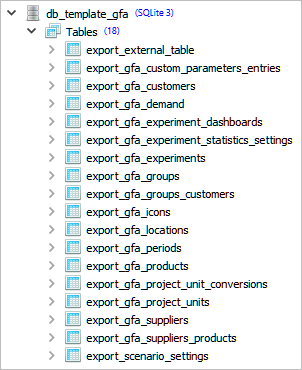
The PostgreSQL database allows exporting to the existing project database file, which contains other system data. In this case you should look for the tables named export_scenarioType_tableName (as shown on the screenshot above).
-
How can we improve this article?
-